
How to Make a Music Video with AI: A Step-by-Step Guide for Full Songs
Learn how to turn a finished song into a complete, character-consistent AI music video synced to lyrics and beats, from storyboarding to final cut.
On this page
If you already have a finished song, you can build a complete AI music video that runs from intro to outro, guided by the track's structure, lyrics, and rhythm. Producing a full-length video requires planning changes across the entire timeline: how the verses build context, what the chorus releases visually, where the bridge turns, and how individual shots add up to a unified piece of work.
SongScene analyzes your audio and lyrics to plan characters, settings, and multi-shot storyboards, generates video across song sections, and stitches the clips to your original master track. Creators define their vision through a director chat, review costs before rendering, and adjust individual shots without starting over.
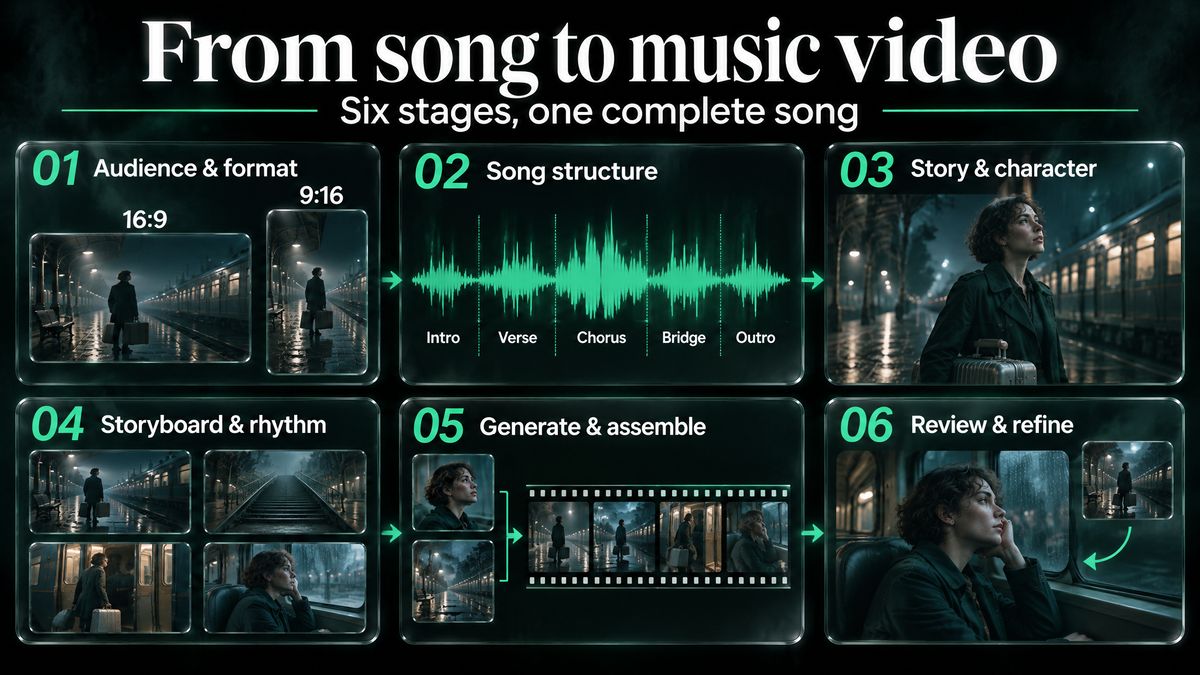
This guide breaks the process into six practical stages: defining the viewing context, deconstructing the song, choosing a video format and character role, mapping out storyboards and shot rhythm, preparing visual anchors for generation, and reviewing the assembled cut against the master track with our AI Music Video Generator.
A fictional three-minute indie-pop song illustrates the workflow: a track about leaving home, moving from early hesitation to a final choice on the last chorus. All timings, character details, and shot lengths demonstrate real production decisions.
Stage 1: Define who watches and where they watch
Start with the audience and playback environment. Devoted listeners who know every word need different visual cues than someone encountering the artist for the first time.
Established fans appreciate subtle lyrical themes and emotional subtext, where opening imagery pays off in the outro. A full-length YouTube music video fits this approach best.
First-time listeners need an immediate human situation or clear visual hook in the opening seconds, giving them a thread to follow across the track.
Recurring artists or virtual personas depend on recognizable continuity. Wardrobe, performance habits, and signature locations build familiarity across releases.
If you plan to promote the track on TikTok, Instagram Reels, or YouTube Shorts, flag strong self-contained sections during storyboarding to extract later as vertical teasers. Keep the main video's emotional arc focused on the complete song.
Lock your aspect ratio before storyboarding. Standard widescreen (16:9) provides room for staging relationships between characters and their environment. Vertical (9:16) keeps the subject front and center on mobile screens. Cropping a 16:9 shot into 9:16 after rendering often cuts out secondary characters or vital props, forcing you to reframe.
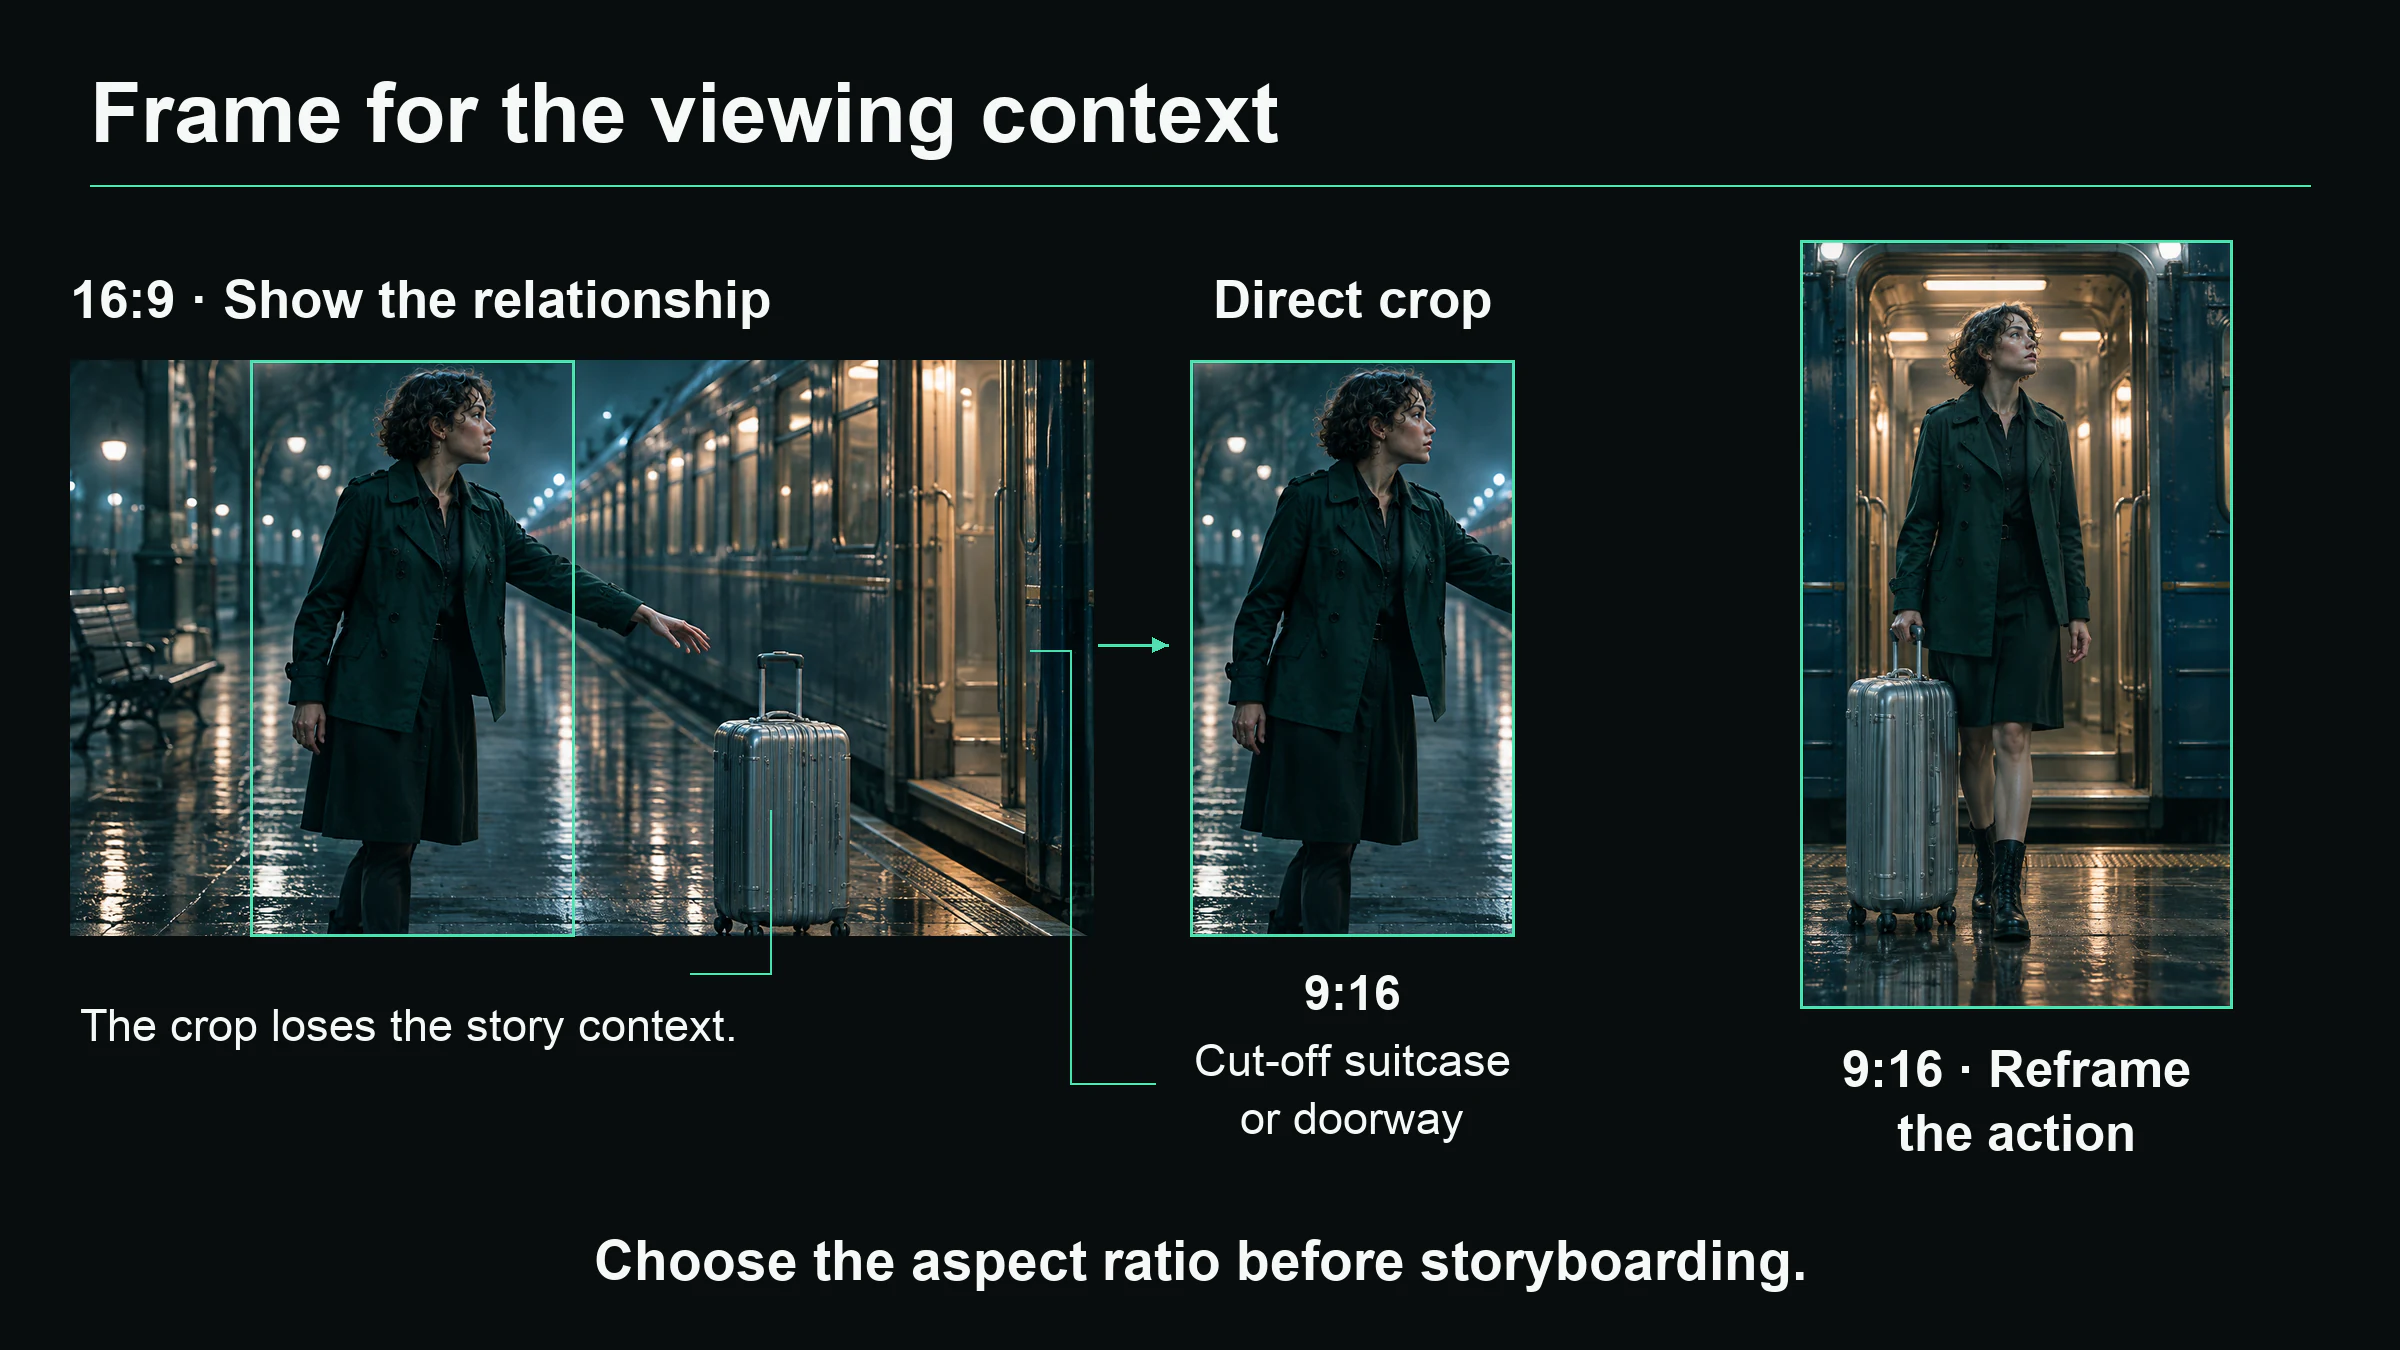
A direct vertical crop loses the suitcase and carriage door in this example. Plan the composition for the intended aspect ratio before generating the shot.
Platform mechanics frame the viewing conditions, but the music determines the tone. A quiet acoustic track can hold attention with a sustained gaze or subtle environmental shifts just as effectively as high-tempo action.
The target for our example song is simple: A widescreen music video for listeners discovering the track, following someone on a late-night train platform deciding whether to leave town. Every casting and staging choice builds on this foundation.
Stage 2: Deconstruct the song into structural shifts
Lock your final audio mix before timing scenes. Changing intro lengths or switching to a new vocal take throws off every cut you already planned. (If you have a visual concept but no finished recording yet, draft melodies and candidate tracks with an AI music generator first.)
On your first listen, map the emotional tone: Is the track mournful, upbeat, or building quiet tension? On the second listen, mark section boundaries and note where vocals enter, drums drop in, or instruments drop out. If the song has lyrics, log when key lines hit and clarify who is speaking to whom.
| Song Section | What to Listen For | How to Stage It |
|---|---|---|
| Intro | Opening signature sound, anticipation before vocals enter | Establish the location, or open on an intriguing action that pulls viewers in |
| Verse | Narrative detail, character circumstances, emotional buildup | Introduce relationships and action; help viewers understand the stakes |
| Pre-chorus | Harmonic tension, drum builds, rising anticipation | Bring the character closer to a decision; shift framing or camera motion |
| Chorus | Core melody, recurring lyrical hooks, energy release | Deliver the primary visual theme; complete a major action or emotional payoff |
| Bridge | New chord progressions, fresh instrumentation, lyrical twists | Change camera angles, break visual repetition, or push intensity higher |
| Outro | How the arrangement resolves, lingering feeling | Reveal the consequence of the character's choice, or return to an altered location |
Every song handles structure differently. Some jump straight from verse to chorus; electronic tracks might use an instrumental drop as their main peak; quiet bridges can strip back to acoustic guitar. Map the changes you actually hear.
Lyrics supply visual clues rather than literal scripts. The line "I finally let go" can show someone stepping onto a night train, or it can show them standing in an empty room. The first externalizes emotion into plot; the second expresses it through empty space.
Instrumental tracks work under the same principles: track melodic entrances, drum changes, solo breaks, and pauses to guide visual shifts.
For our platform example, the section notes stay focused: The intro establishes the cold station platform; Verse 1 shows the traveler waiting for someone who hasn't arrived; Chorus 1 sees them step toward the train, then freeze; the bridge brings one last look back at the entrance; the final chorus shows them boarding alone; the outro lingers on the train window pulling away. Musical repetition mirrors changing resolve.
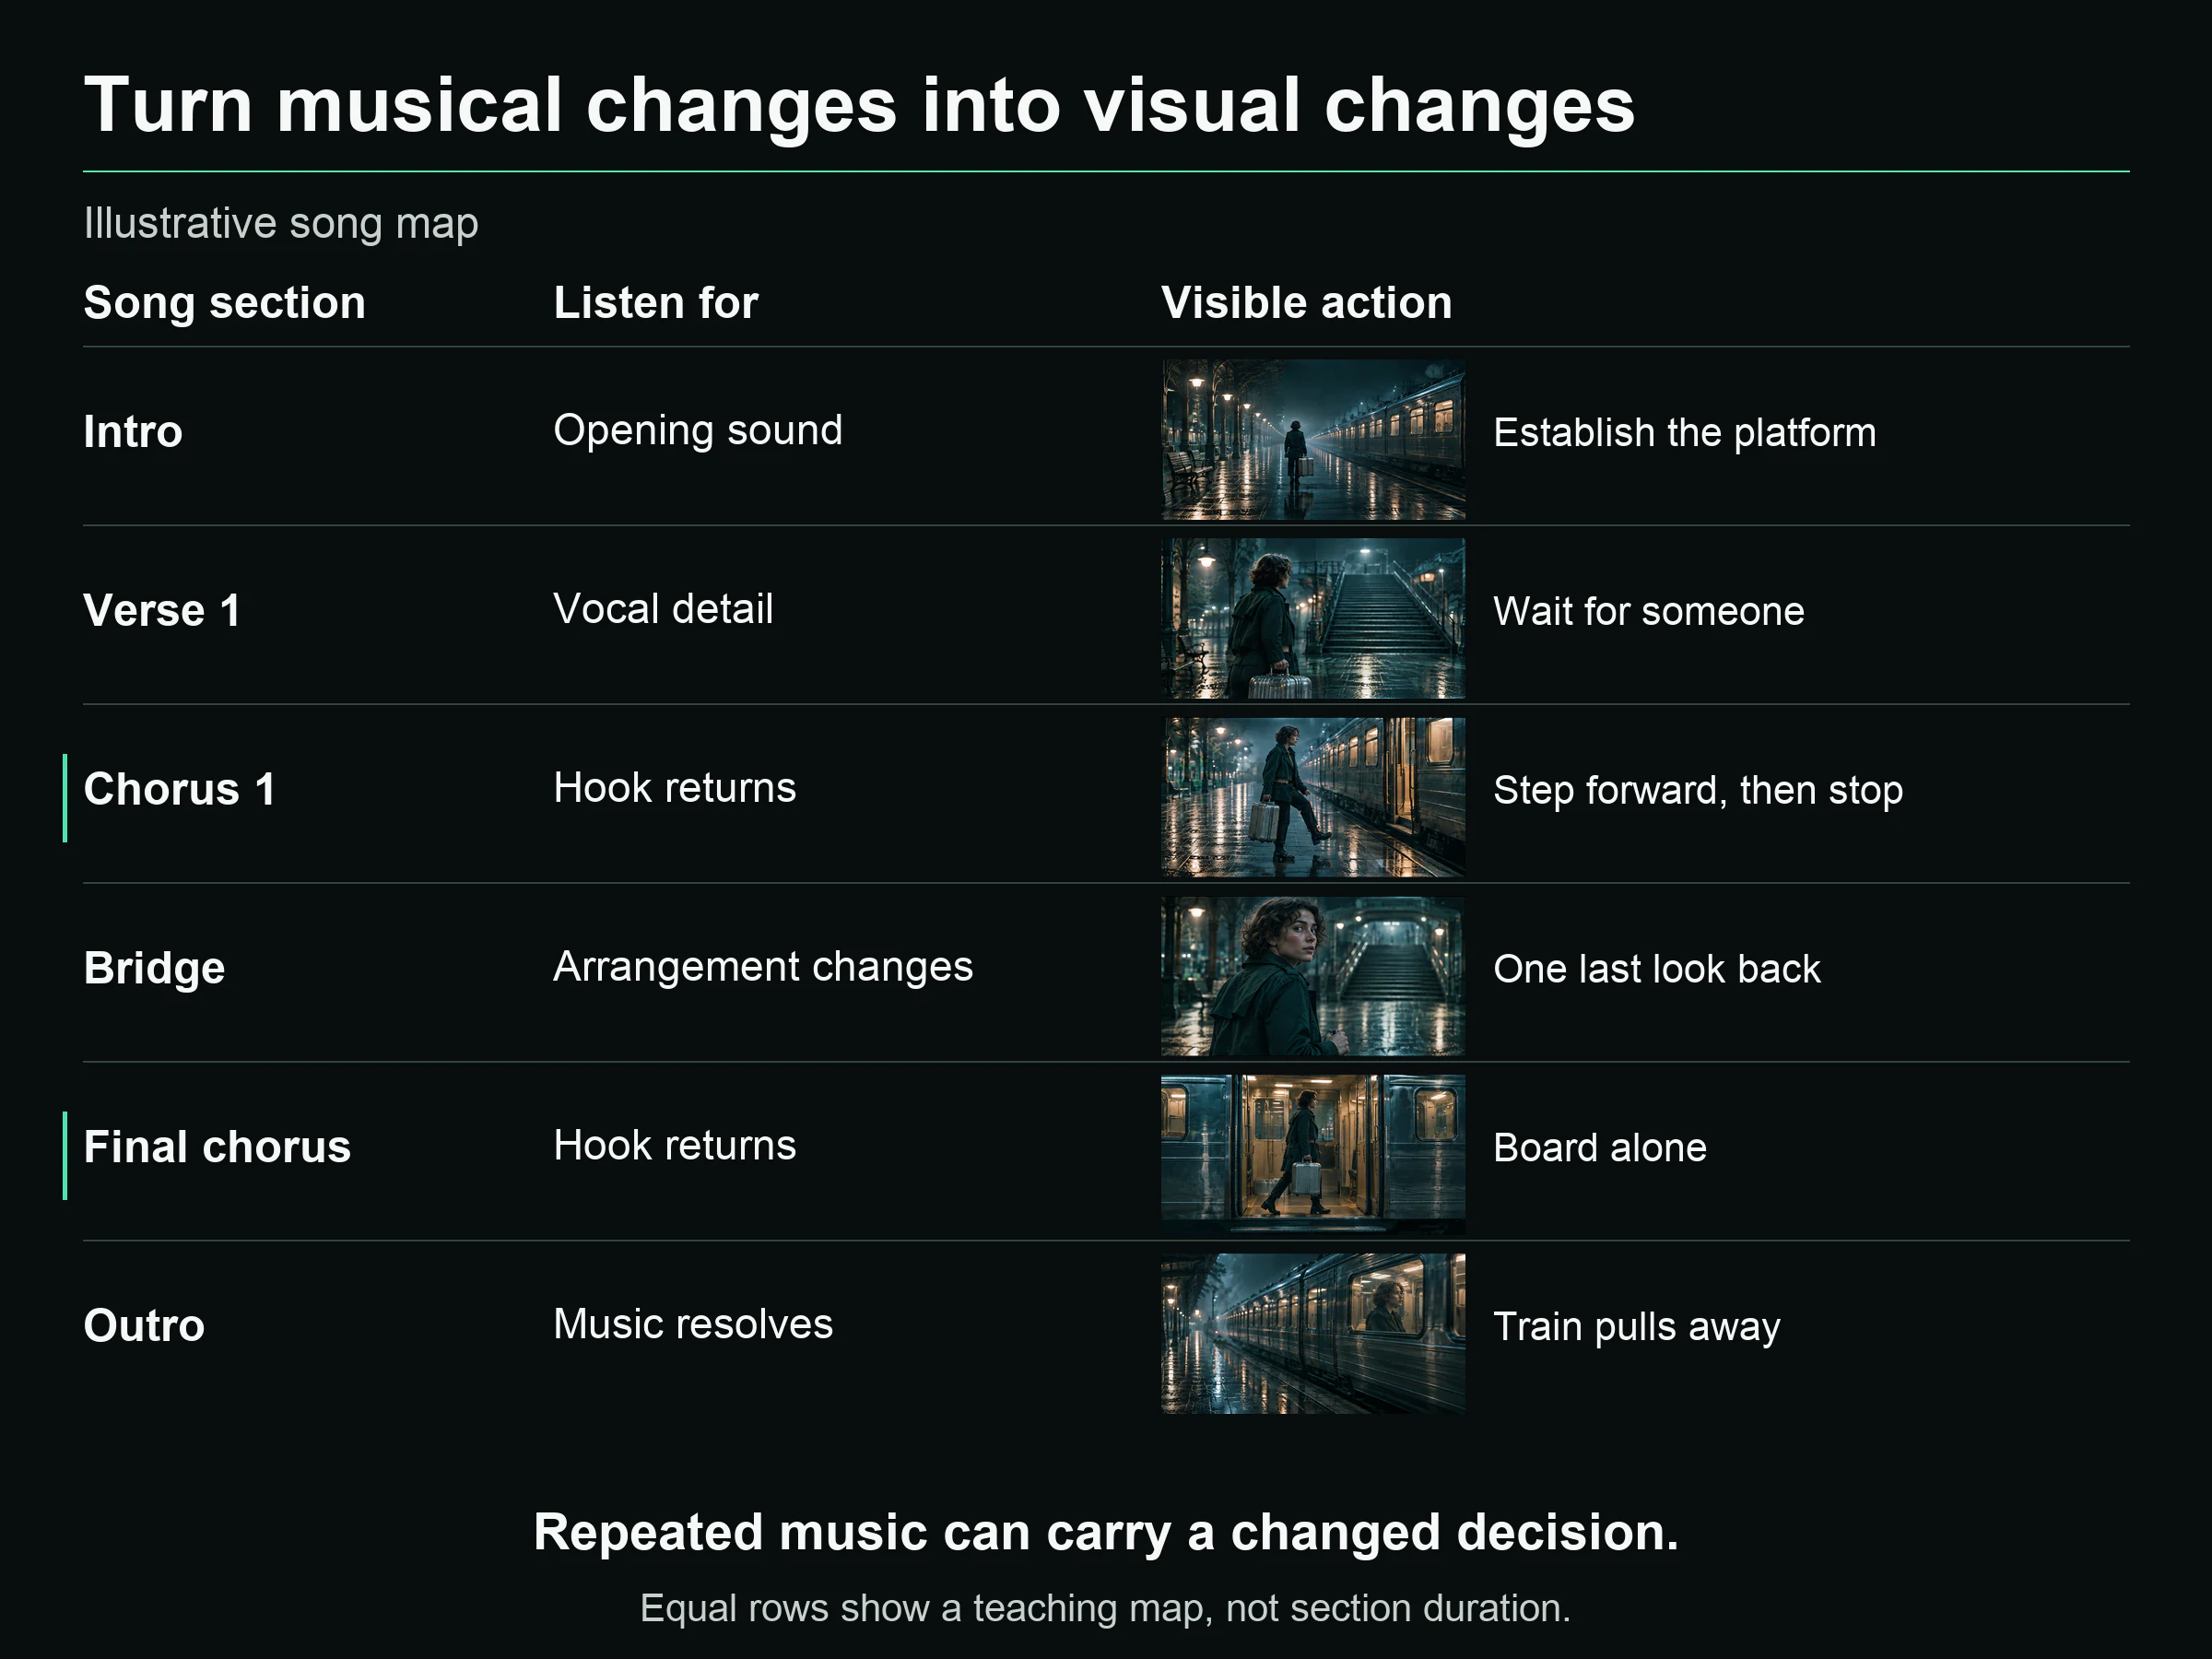
Both choruses bring back the hook: the first leads to a step forward and a stop; the last leads to boarding alone. The bridge's arrangement change accompanies a final look back. Equal row heights do not represent section duration.
A full-length video must account for every second of the audio, including instrumental intros, interludes, and fade-outs. Whether shots repeat motifs or linger on evolving wide angles, each choice belongs to one overarching treatment.
Stage 3: Choose your format and define the lead's role
Before picking an art style, decide how the video presents its world. Four core formats cover most music video concepts:
| Format | Primary Focus | Key Production Question |
|---|---|---|
| Performance | Singing, rapping, instrumental playing, direct engagement with the camera | Who performs, which sections require lip-sync, and how performance intensity shifts |
| Dance | Choreography, body movement, formations, and physical rhythm | What movement sequences form the core phrase, and how wide must the camera stay to capture them |
| Narrative | Characters pursuing goals, facing obstacles, and making choices | What does the protagonist want, what stands in their way, and how does the ending change them |
| Concept | A central visual idea evolving through varied spaces, actions, or motifs | What visual metaphor connects the scenes, and how does it develop across the track |
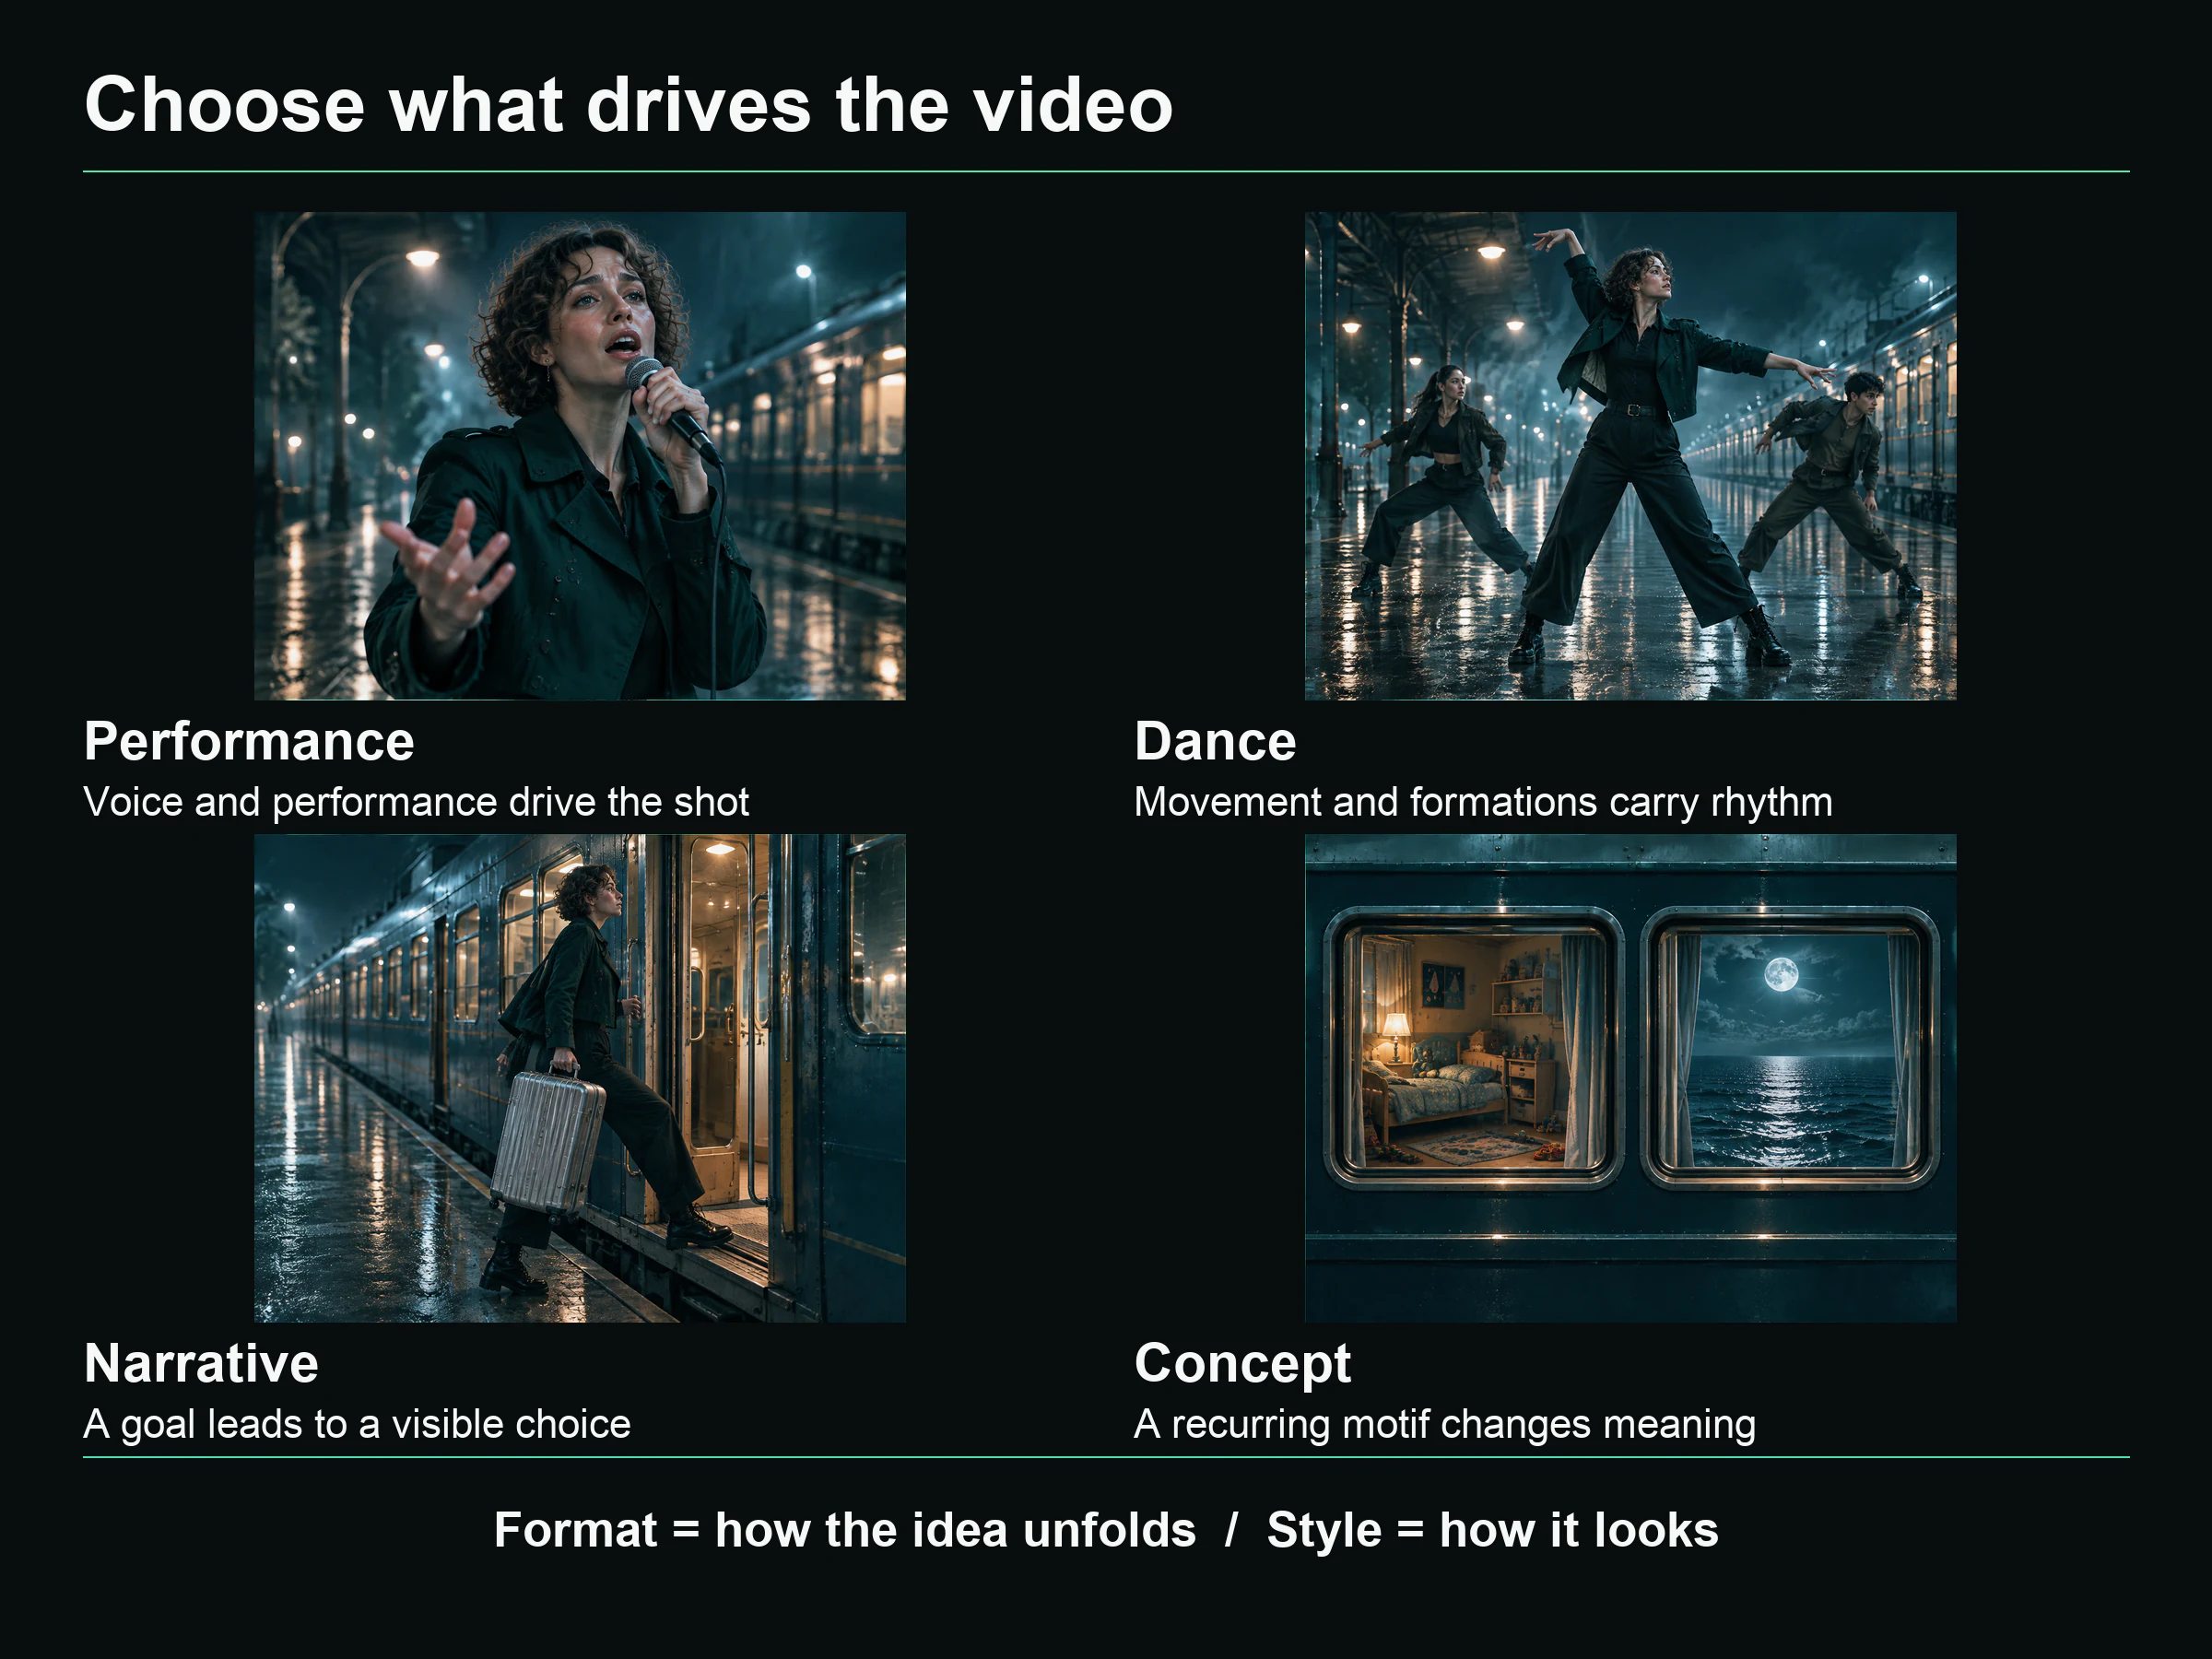
Performance follows the voice, dance follows movement, narrative follows choices, and concept develops a recurring motif. Any of these formats can use live action or animation.
These categories often blend. The key is choosing one primary anchor so secondary elements do not derail viewer focus. A narrative video can cut to performance shots during choruses, or a dance video can feature surreal concept vignettes during the bridge. Know why and where those transitions occur before generating footage.
An upbeat vocal track does not force a singing performance on screen. High-energy dance grooves can rely on cinematic editing and environmental movement. The choice depends on what best serves the song.
Style (photoreal live-action, 2D animation, oil painting, retro digicam) is distinct from format. An animated video can tell a grounded narrative, while live-action footage can remain purely abstract. Lip-sync is a specific performance tool that can appear in narrative or concept pieces when called for.
Lyric meaning, on-screen vocal performance, and text captions operate independently. You can keep verses purely narrative with off-screen vocals, feature lip-synced singing on the hook, and decide later whether to burn in stylized lyric captions for social viewing.
Narrative: give your character an actionable dilemma
Describing a lead as "a lonely traveler" sets a mood, but gives the camera nothing concrete to film. Make it an active situation: "A young traveler waiting on a cold platform for someone who never shows, deciding whether to board the last train alone."
Now the scenes have visible actions: checking a pocket watch, staring down the empty stairwell, stepping toward the carriage door. The lead does not have to be the singer; a songwriter can stay behind the scenes while an actor carries the story.
Concept: anchor abstract imagery with a recurring motif
Concept videos can center on a person, an object, or an architectural space. The goal is keeping the imagery unified so it never feels like unrelated stock clips.
In our departure scenario, a concept approach might keep the traveler seated in an empty train carriage for three minutes, while the window view cycles through their childhood bedroom, familiar city streets, and open ocean. Viewers experience the feeling of leaving past lives behind without tracking literal geography.
To maintain continuity across abstract cuts, repeat key compositional anchors: the rectangular window frame, a specific green coat, or a single warm light source. When those elements shift on the second chorus, the audience registers deliberate artistic progression.
Summarize your treatment into a single creative brief before opening the AI Music Video Generator: target audience, primary format, lead character or motif, emotional arc, and visual aesthetic.
Stage 4: Turn song sections into a storyboard and dial in rhythm
Song sections, scenes, and individual shots represent three distinct production layers.
A single chorus section set on a train platform might break into four shots: a medium shot of the traveler, a cutaway to the empty gate, a close-up on luggage wheels, and a tracking shot toward the open door. Storyboarding breaks musical time into executable visual beats.
Every storyboard entry needs five components: the timestamp range in the master track, what the viewer sees, what the character does, how the camera moves, and how the shot cuts to the next frame.
Avoid vague notes like "the character looks sad." Write concrete camera directions: "Medium side-profile. The traveler watches the station entrance, turns back as the train bell chimes, and shifts their gaze to the open carriage doors." Visible actions give generative engines clear parameters and create natural transition points.
Balance cutting pace, subject action, and camera velocity
Pacing operates across three independent speeds: how fast you cut, how quickly the subject moves on screen, and how fast the camera travels.
Rapid cutting does not require hyperactive character motion. Cutting quickly between static angles of someone standing still builds psychological claustrophobia. Conversely, a sustained single take can follow a dynamic, high-energy dance routine without a single edit.
Match your shot duration to the information density. Establishing a new location takes two to three seconds for a viewer's eye to orient; an emotional reaction on a familiar face lands in under a second. Give choreography enough wide-angle screen time for feet and formations to register, and reserve tight close-ups for vocal phrasing or decisive gestures.
Musical landmarks (drum fills, vocal pauses, snare hits, bass drops) make natural cut points, but cutting on every single beat quickly becomes exhausting. Let shots breathe across two or four bars, timing character turns or lighting changes to coincide with downbeats.
At 120 BPM in 4/4 time, each beat lasts 0.5 seconds and each measure spans 2 seconds. While this helps calculate approximate shot lengths, it should never turn editing into a mechanical formula.
Here is how the final chorus of our sample track translates into a 16-second storyboard sequence:
| Master Timestamp | Duration | Shot Description & Action | Dramatic Purpose |
|---|---|---|---|
| 2:04–2:08 | 4s (2 bars) | Medium shot. Carriage doors slide open. Protagonist pauses on the yellow line, looking back at the entrance. | Holds the final moment of hesitation. |
| 2:08–2:10 | 2s (1 bar) | Cutaway. Wide static angle of the empty stairs and turnstiles; no one arrives. | Confirms the passenger is truly alone. |
| 2:10–2:16 | 6s (3 bars) | Over-the-shoulder tracking shot. Camera follows behind as they pick up their bag and step across the threshold. | Turns passive waiting into irreversible action. |
| 2:16–2:20 | 4s (2 bars) | Interior close-up. They sit by the window, eyes turning from the glass to look forward down the aisle. | Resolves the emotional tension into acceptance. |
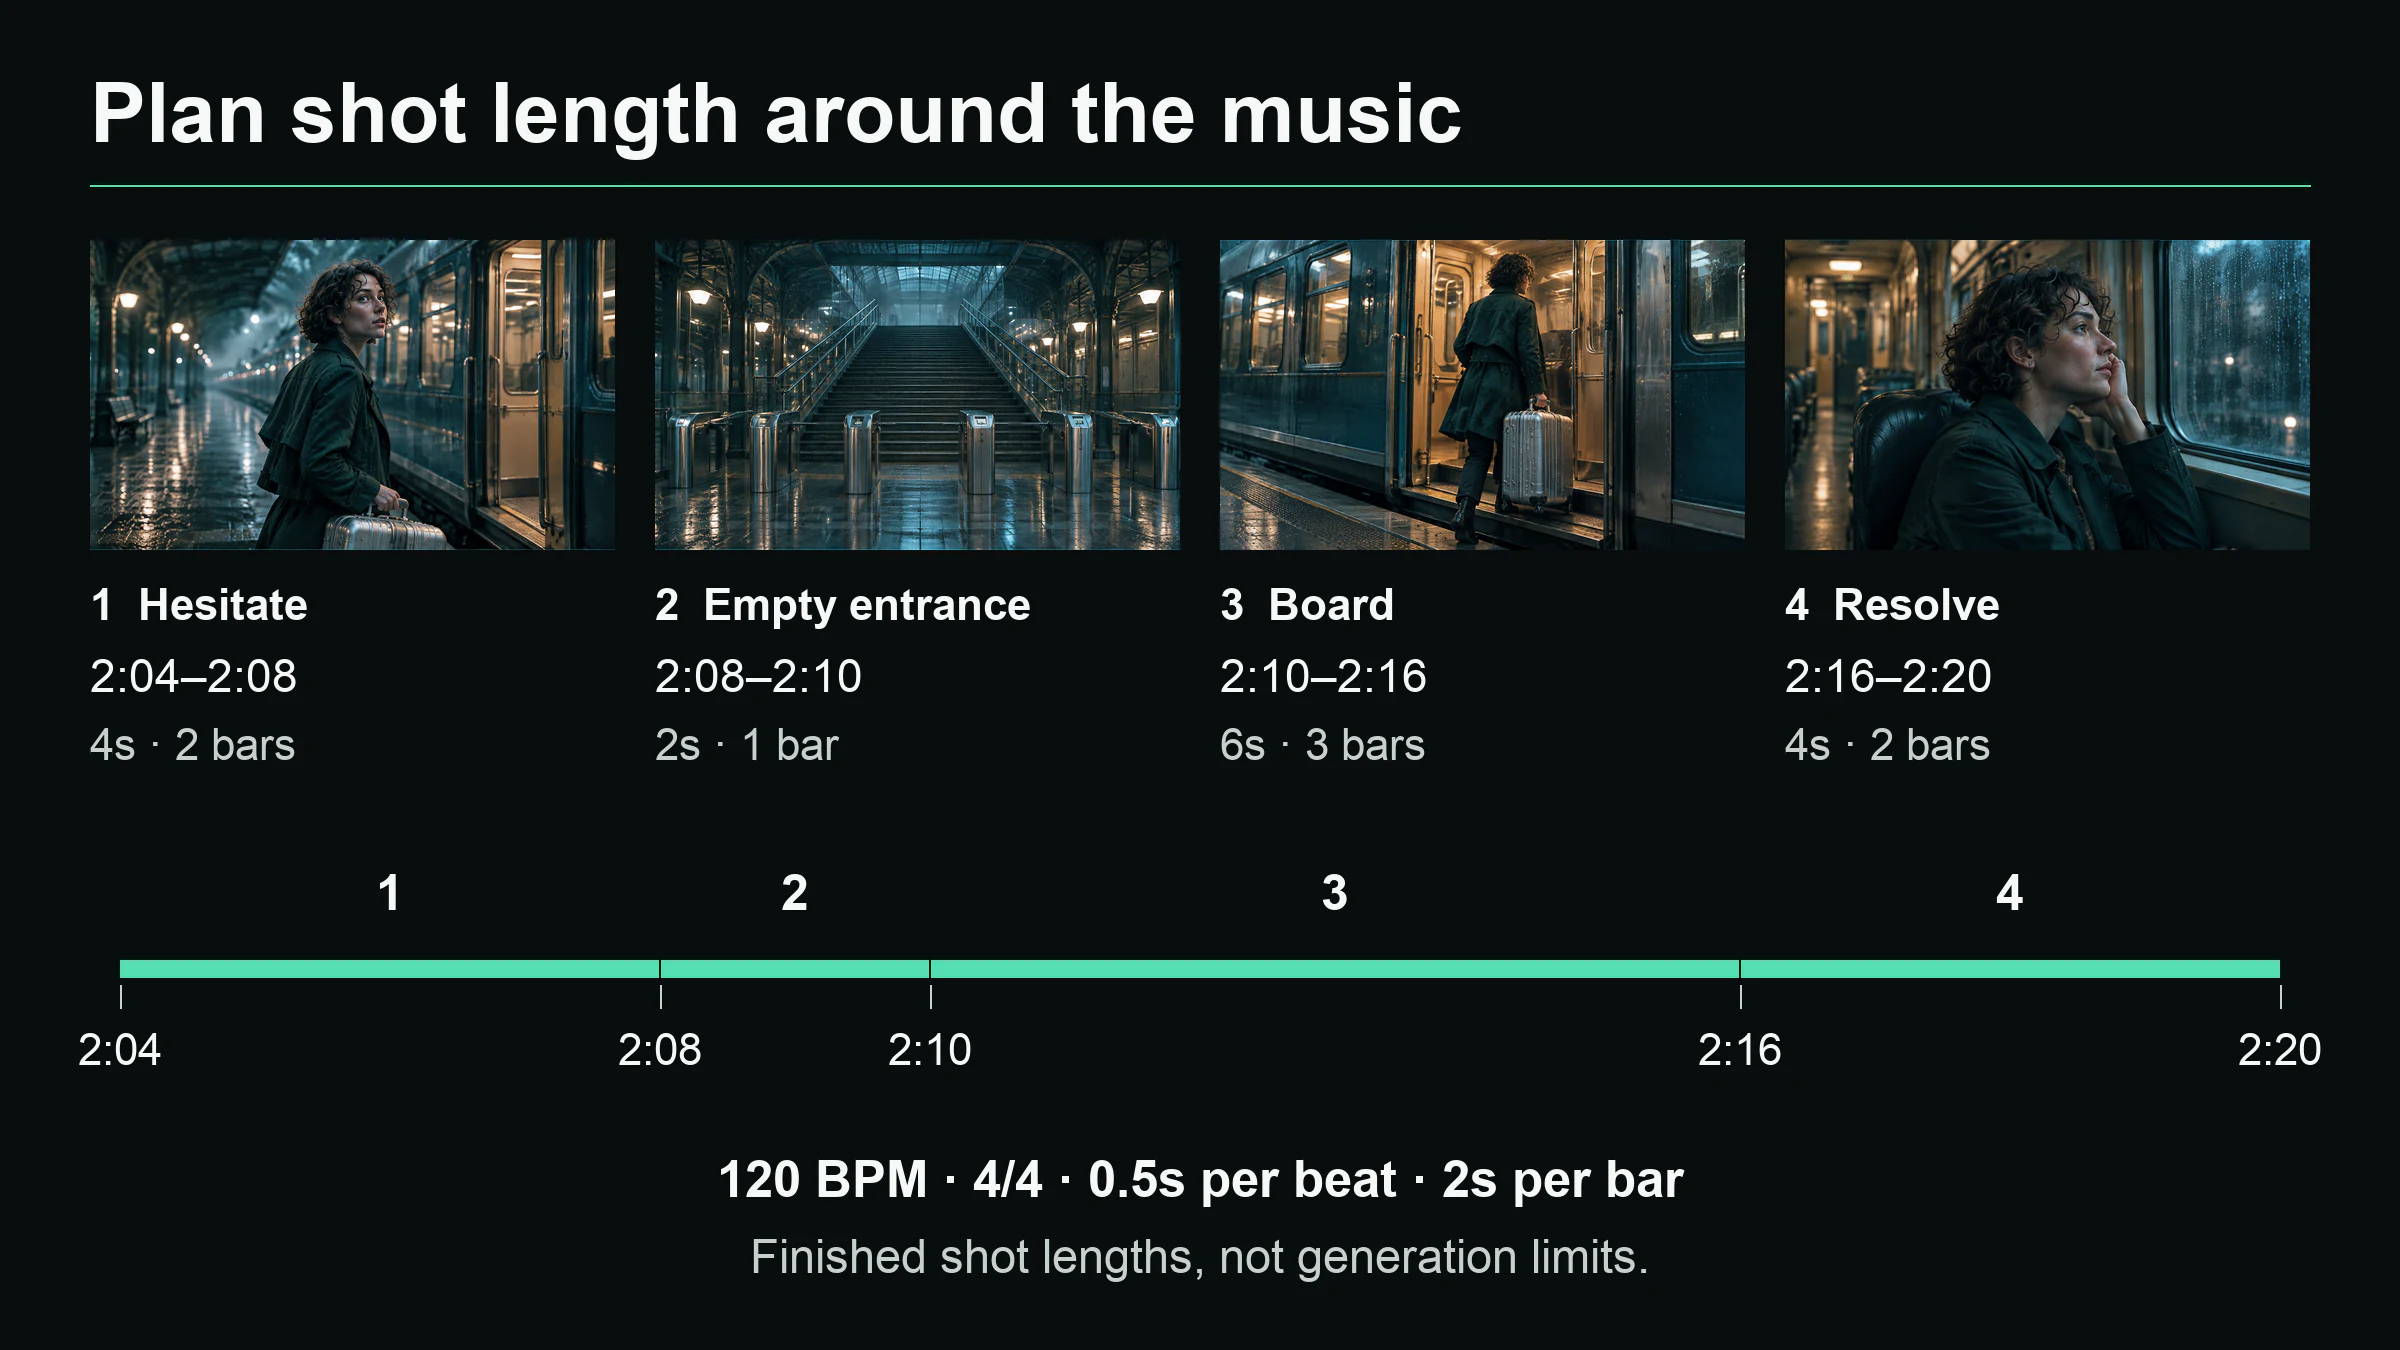
At 120 BPM in 4/4, these four shots last 2, 1, 3 and 2 bars. The timeline shows finished edit lengths; generated clips may need trimming or stitching.
These timings reflect finished on-screen shot lengths. Generative AI tools often render clips in fixed increments (such as 4-second or 5-second generations); plan your shots based on the music first, then stitch or trim generated source clips to match your edit.
Watch screen direction across cuts. If your subject walks toward screen-right in shot one, having them enter from screen-right in shot two makes them appear to double back. Intentional jump cuts can work for energetic pop videos, but accidental directional flips disorient the viewer.
Stage 5: Align reference assets, generate clips, and assemble the full MV
Lock down visual reference anchors before rendering any video. Character portraits and environment references should be approved early so they guide every prompt through storyboarding.
If the video has a lead character, establish their facial features, hairstyle, clothing, and distinctive accessories. If our traveler wears a dark-green cropped trench coat and carries a scratched aluminum suitcase, every prompt and reference slot must enforce those details.
Recurring environments require clear spatial geometry: Where are the station stairs relative to the train doors? Which side of the platform is the track on? Establishing a spatial sketch or environment keyframe prevents the platform from looking like a subway station in verse one and an open-air commuter rail in verse two.
Lock your visual palette next: lighting temperature, contrast ratios, and color grading. A reference prompt like "fluorescent platform lights casting alternating pools of warm amber and deep shadow" yields far more consistent results than generic buzzwords like "cinematic 8k lighting."
Prompts should focus on immediate physical action and framing rather than emotional backstories:
A young woman in a dark-green cropped trench coat carries a silver aluminum suitcase across a dimly lit train platform toward an open carriage door. Smooth low-angle tracking shot from behind. Consistent with character reference and amber station lighting.
Asking an engine to show the traveler "remembering childhood, running, singing, and arriving at the ocean" in a single prompt creates visual chaos. Break compound actions into individual storyboard clips.
Inside SongScene's AI Music Video Generator, your treatment generates character model sheets, environment sketches, and shot prompts. Before starting video generation, you see an estimate breakdown covering models, durations, and credit costs. Check pricing and credits to pick the right resolution and model tiers for your production budget.
Once confirmed, clips render across the timeline and stitch sequentially against your master audio, delivering a full-length, synchronized music video.
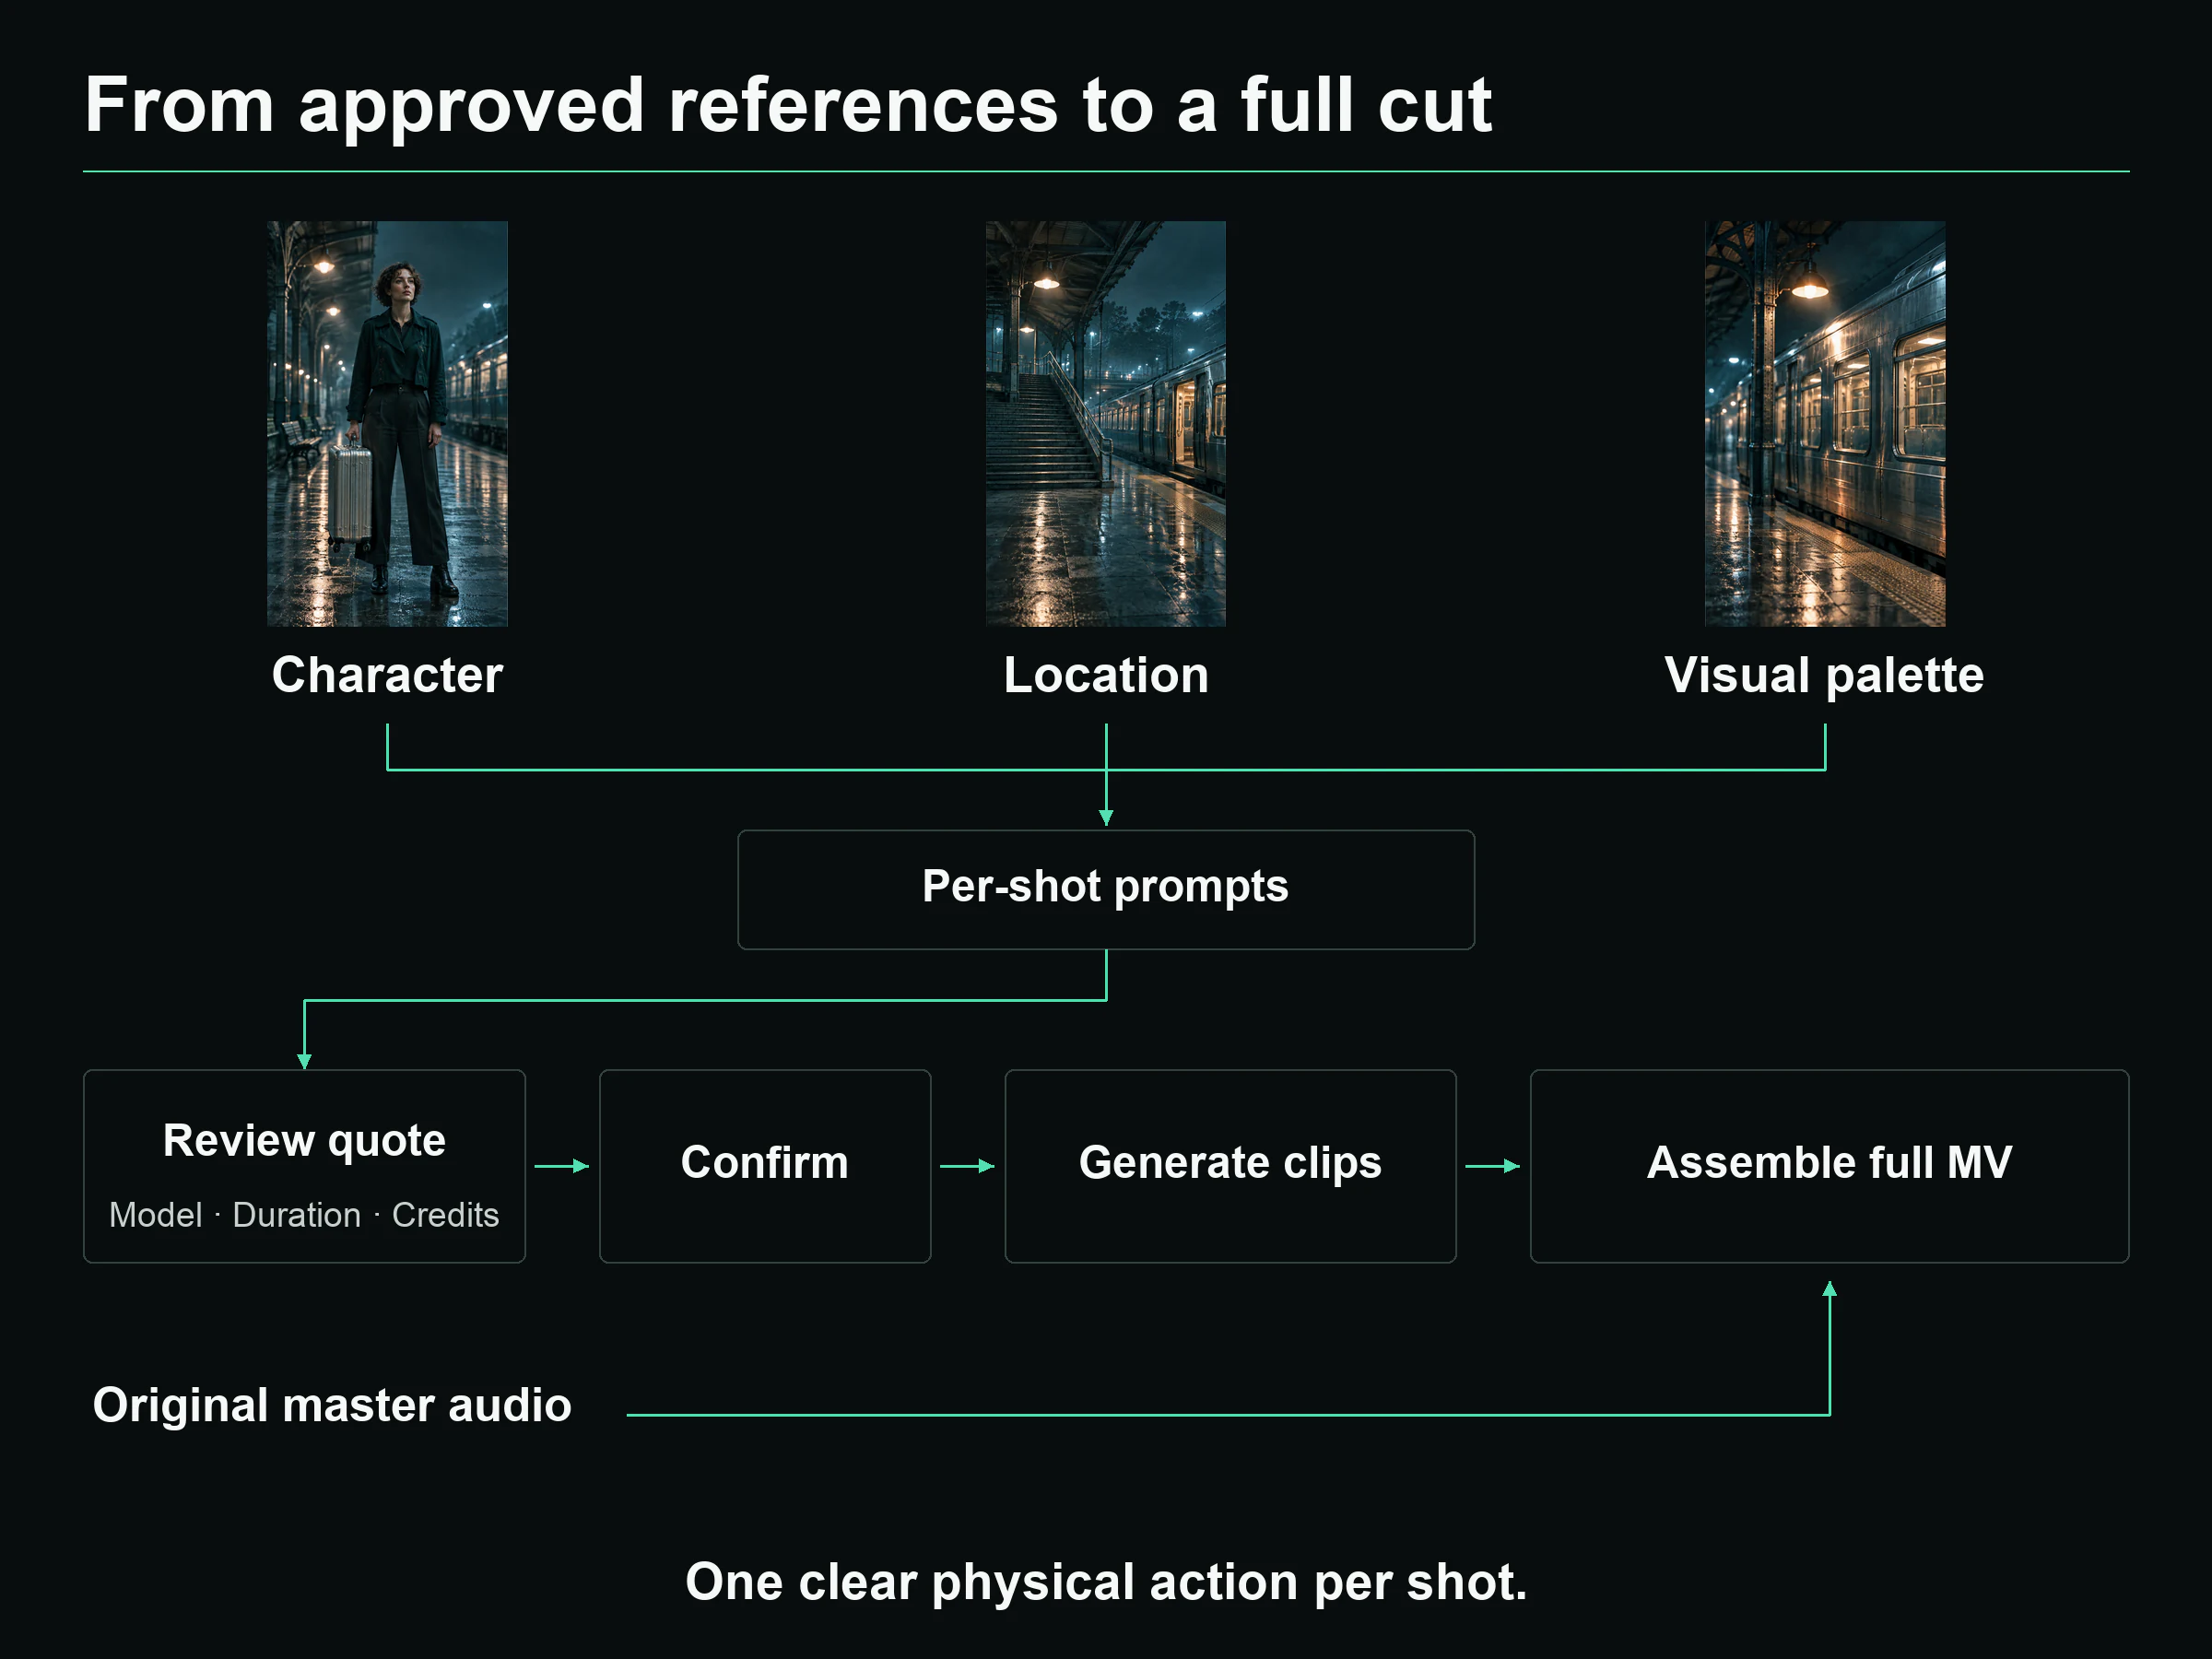
Review the model, duration and credit cost before confirming generation. The original master audio enters at assembly, separately from the generated video clips.
Stage 6: Review against the master track and refine individual shots
When the assembled video is ready, watch it from start to finish without pausing. Confirm that every song section has visual coverage, that audio sync holds through cuts, and that the story moves smoothly across the full track.
Evaluate the cut through five practical checks:
Audio-visual sync: Do dramatic visual shifts land on key musical changes? Do lip-synced sections match vocal timing?
Narrative clarity: Can a first-time viewer follow the protagonist's choices? In concept pieces, do visual motifs evolve rather than stagnate?
Visual continuity: Does character wardrobe, hair, and spatial direction stay consistent across cuts? Do unnatural AI warping artifacts pull attention away from emotional moments?
Pacing and breathing room: Does the edit feel rushed in quiet verses or sluggish during peak choruses? Does the outro give the music room to fade?
Display context: Check playback on both desktop screens and mobile phones. Are details and lyric captions legible when scaled down?
Tie notes directly to timestamps: "At 2:08, the traveler turns two beats before the vocal cue," or "The suitcase color turns black on the boarding cut at 2:10."
In SongScene, you never have to discard a successful three-minute video over one flawed shot. Open the project in Canvas, tweak the prompt or reference image for the affected clip, review the targeted estimate, and regenerate only that segment. The editor updates the timeline and re-stitches the master video while preserving the rest of your cut.
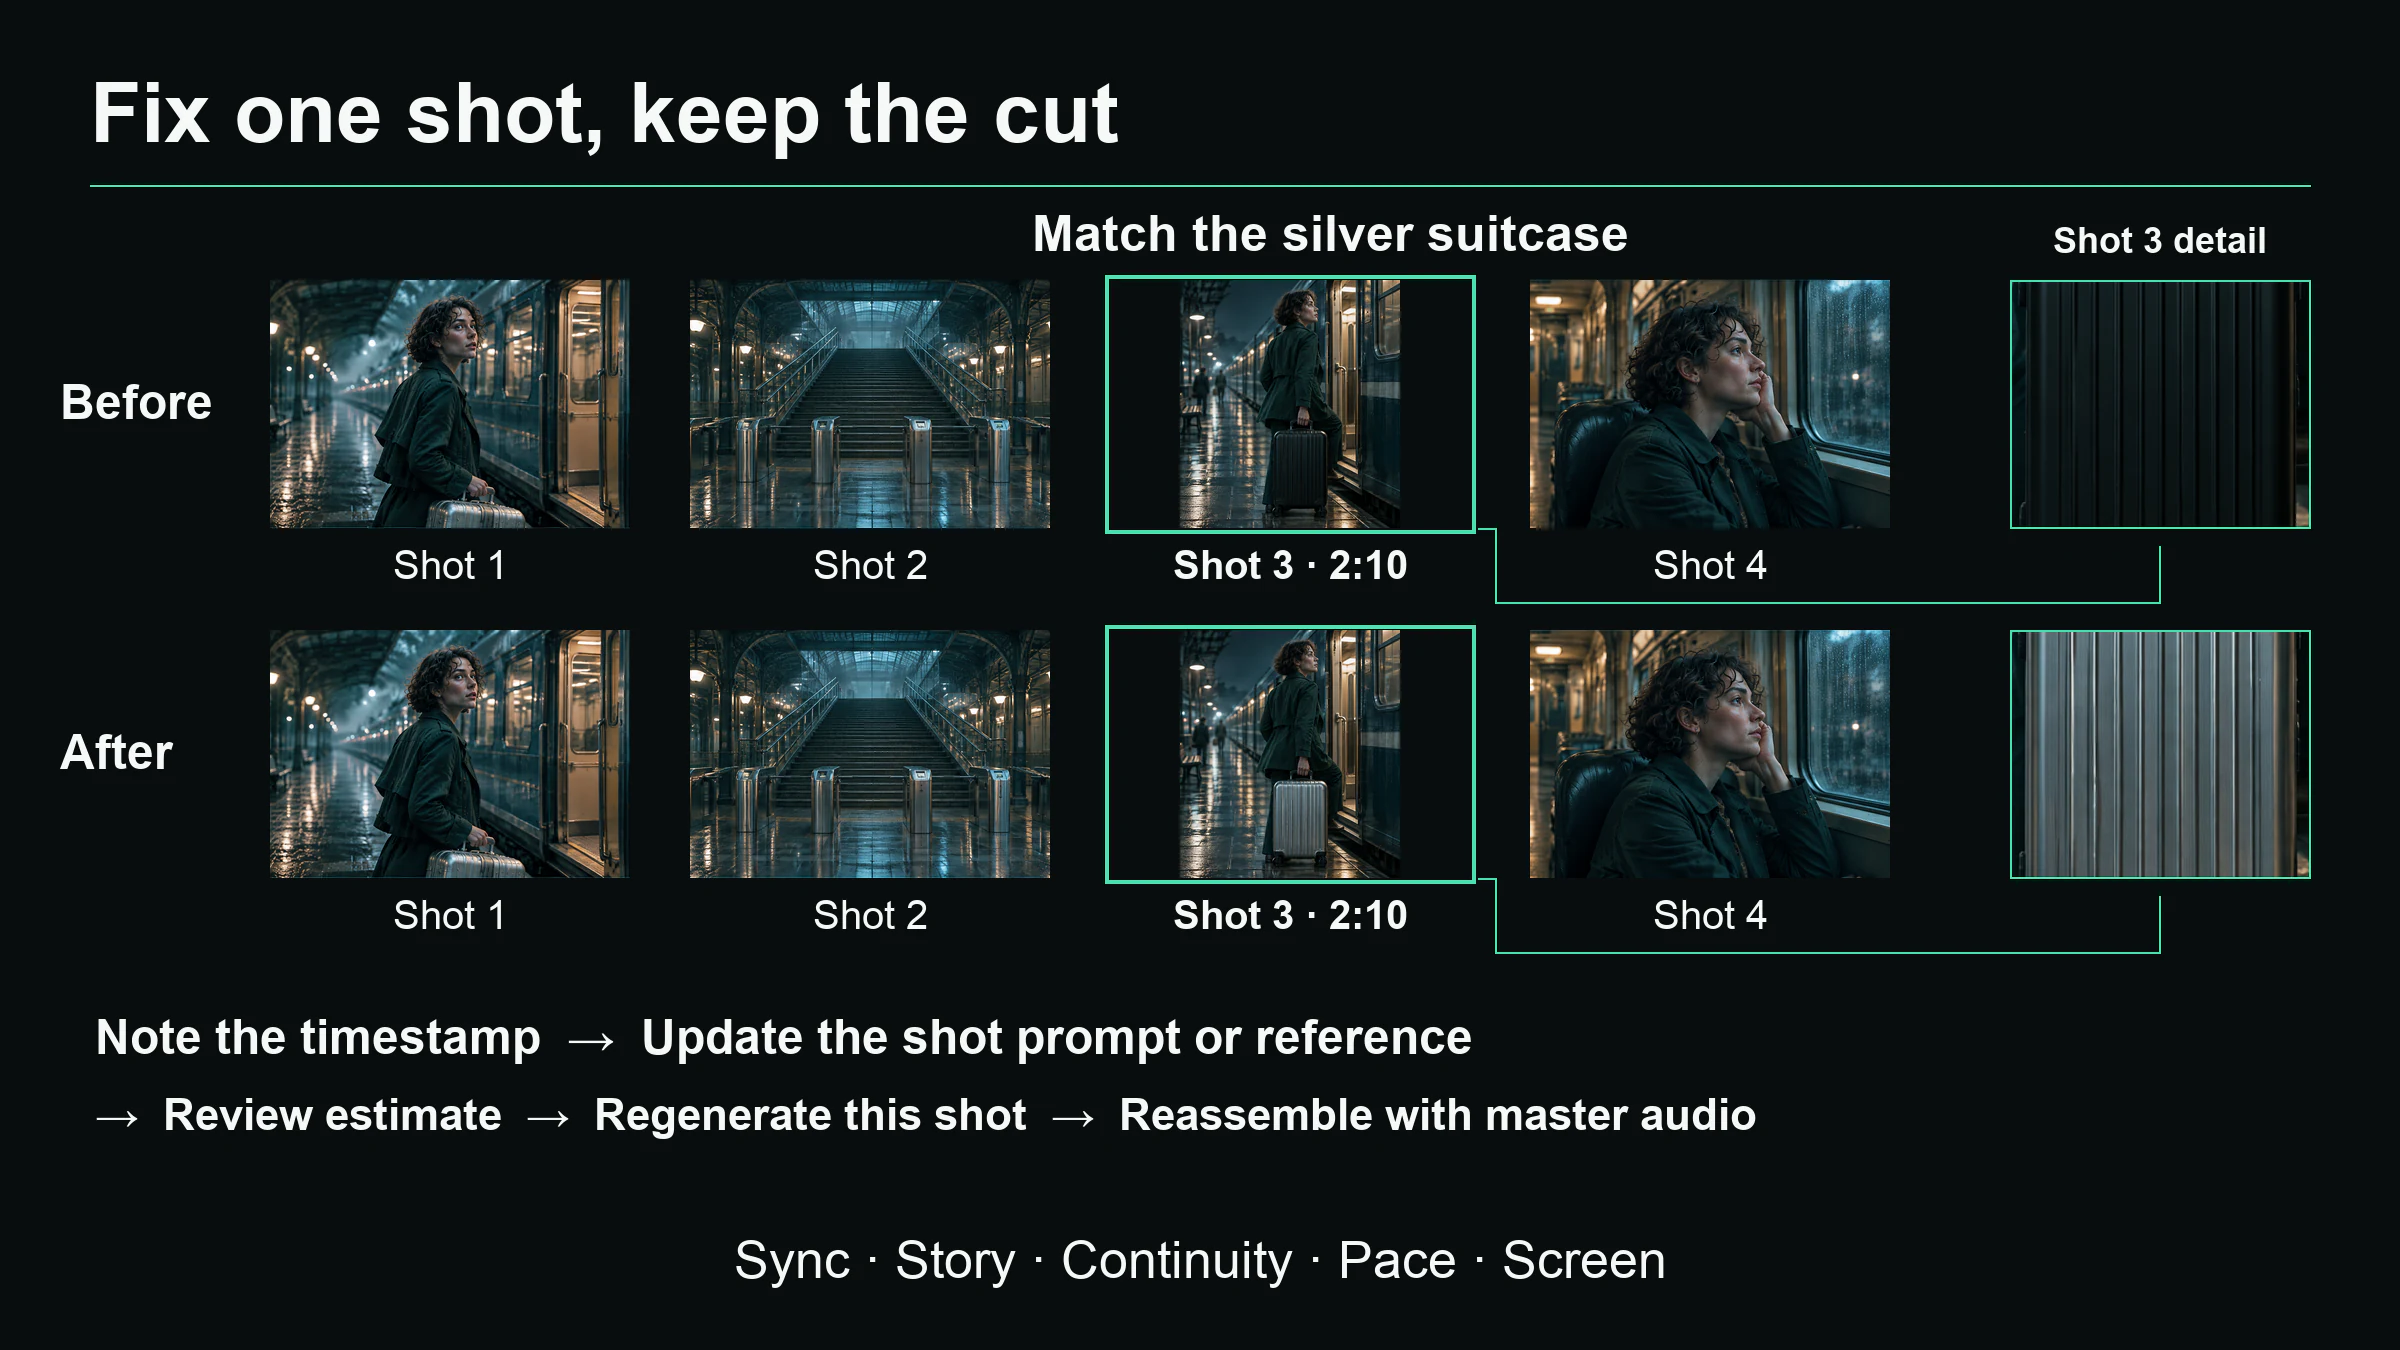
Locate the mismatch by timestamp, update that shot's prompt or reference, review its estimate, and regenerate it. Reassemble with the master audio while keeping the other approved shots.
On your final review pass, verify the core arc: Did the audience see the character move from hesitation to boarding that train? When visual changes match musical progression from the opening bar to the final decay, you have a complete music video ready for release.